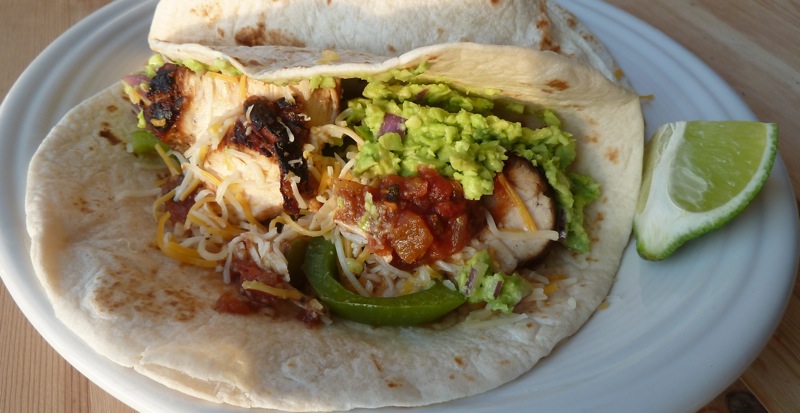
Thanks to Homesick Texan, I've finally learned how to make decent fajitas. We love fajitas so much in the Clack house, I can't really express how delighted we were that we've at long last, made delicious fajitas at home. Nothing reminds us of living in Texas like fajitas. Our kitchen still smells like peppers, limes and cumin and it makes us smile every time we walk in the door! Well let's get to the recipe shall we? Chicken FajitasSource: Homesick TexanServes: 6 For marinating the chicken: 1/4 cup lime juice 1/4 cup olive oil 1 tablespoon balsamic vinegar 1 teaspoon Worcestershire sauce 6 cloves garlic 1 teaspoon ground cumin 4 serrano chiles, stems removed and chopped salt and pepper to taste 2 pounds boneless, skinless chicken breasts (if the breasts are quite large, I would recommend cutting them in half and then marinating. Our chicken was so big it was hard to cook it all the way through without burning the outside.) For the fixin's: 2 tablespoons vegetable oil 2 bell peppers, seeds and stems removed and sliced. 1 medium yellow onion, sliced salt to taste 12 flour tortillas guacamole, salsa, shredded cheese, refried beans, whatever you like on your fajitas! Mix together the lime juice, olive oil, balsamic vinegar, Worcestershire sauce, garlic, cumin and serrano chiles in a blender until smooth. Add salt and black pepper to taste. Pour over the chicken and marinate for at least 1 hour in the refrigerator. When you're ready to start cooking, set the oven to 200 or 250. Wrap the tortillas in aluminum foil and place them in the oven. This way they will be warm when it is time to eat! Heat 1 tablespoon vegetable oil in a skillet over medium heat. Remove the chicken from the marinade and cook until done, about 5 minutes per side (or until the inside is 160 degrees). Remove the chicken and let it rest while we cook the peppers and onions. Heat the other tablespoon of vegetable oil in the skillet and saute the onions and peppers over medium heat until they are tender, about 10 minutes. Add salt to taste. Slice the chicken and serve with the pepper and onions in the warm flour tortillas. Then top with your favorite fixins! As you take your first bite, close your eyes and pretend you are on a beach drinking a margarita. This last step is optional, but I highly recommend it!

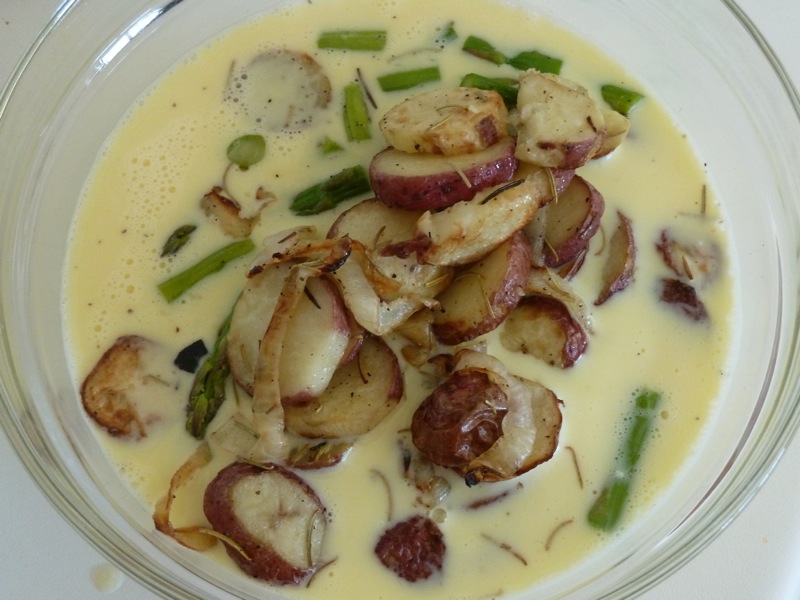
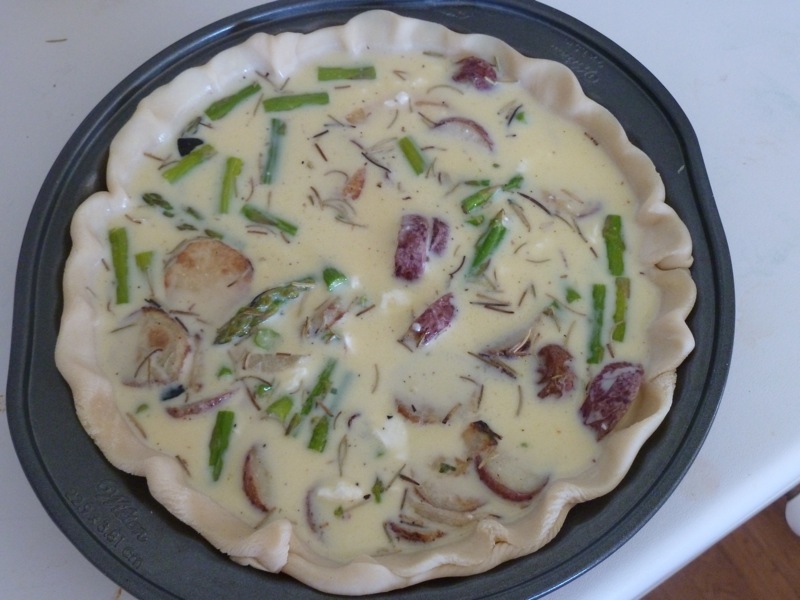
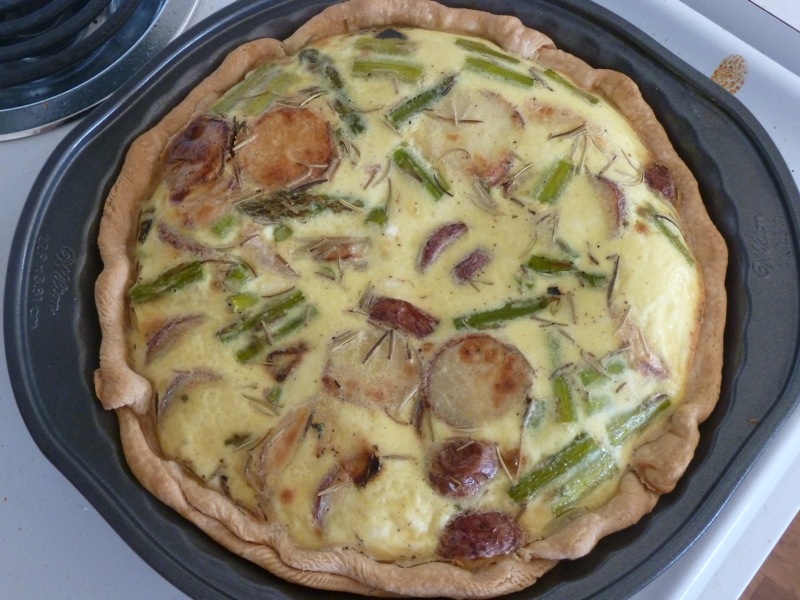
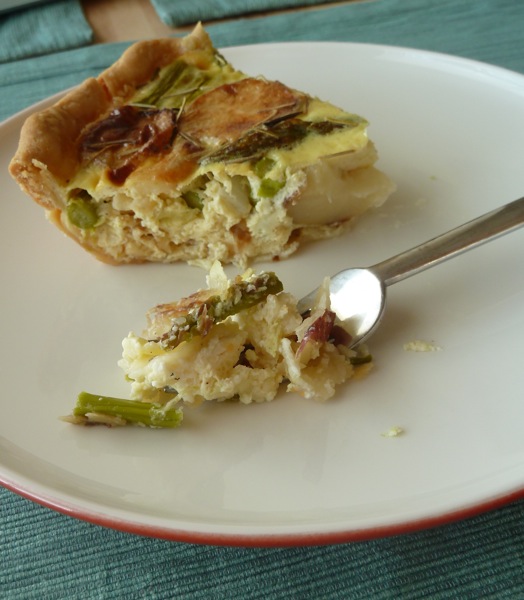
Roasted Asparagus, Potato, Onion Quiche with Feta and Rosemary
I make quiches a lot. Like, every week. I do this because I'm very picky about my breakfasts, not because I'm a connoisseur, I'm just weird. My first meal of the day must be filling, savory and have various ingredients. I can't just have a fried egg by itself for example. Plus it needs to be prepared in 1 minute or less, I like to sleep in as late as possible, you see.
A quiche made on the weekend, and reheated every morning is the only food I can think of that fills all these requirements. If you have other ideas, let me know in the comments! Now, you might be thinking "A slice of quiche every morning? Molly, surely you get sick of that!" Usually you would be right, but quiches can be made in so many different ways to help keep your interest. One might also object, "Quiches are so fattening, you shouldn't eat them so often!" And to that I reply, yes, generally that is true, but since there are so many options for quiche ingredients, you can easily make healthier choices.
Which leads me to the purpose of this post, a Choose-Your-Own-Adventure-Quiche! Just pick one or two ingredients from the categories below, put them together, bake them, and baby you got a quiche! Oh, I almost forgot another reason I love making quiches. Since there are such a variety of ingredient options, it's a great way to use up leftover ingredients.

Spinach, Bacon, Feta and Cheddar Quiche
1. 9 inch Pie Crust-You can buy it pre-made. -You can make it yourself using whatever sort of fat you choose. -You can make it gluten-free. (There are tons of recipes online) -You can buy a gluten-free pie crust mix. (Lots of options, just google "gluten-free pie crust mix) -Or skip the crust altogether! Just make sure to grease the pie pan a lot so the quiche doesn't stick. 2. Eggs-4 eggs -8 egg whites (if you do this add more milk to the mix)

Spinach, Onion and Feta Quiche
3. Milk
-1 cup heavy cream
-1 cup half and half
-1 cup whole, 2%, or skim milk
-1 cup buttermilk
-1 cup goat's milk
4. Vegetables (with appropriate seasonings) Choose as many as you want!
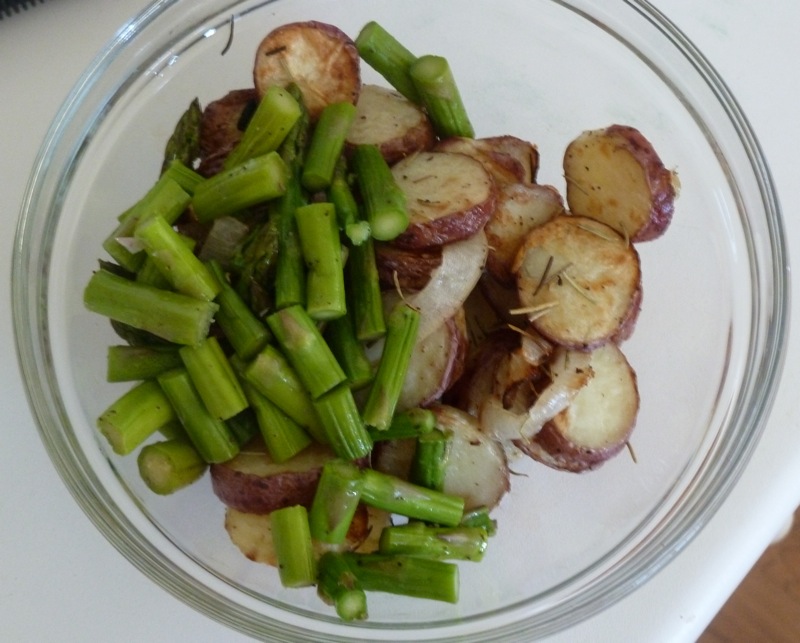
-I'll often use any leftovers from side dishes (That's what I did for the roasted potato and asparagus quiche.)
-Spinach (defrosting one of those frozen packages is the perfect amount)
-Onions (you can never go wrong with onions, raw or cooked, you'll need about a 1/4 of an onion)
-Steamed Broccoli
-Roasted Red Peppers (great with basil and garlic)
-Sauteed Green Peppers
-Roasted Red Potatoes (soooo good if sliced and roasted in olive oil with onions and rosemary)
-Roasted Asparagus (perfect if roasted with olive oil, salt and pepper and a squirt of lemon)
-Sauteed Mushrooms
-Sauteed Squash or Zucchini
-Top quiche with thinly sliced tomatoes
-Any other vegetable you can think of!

Roasted Red Pepper, Red Onion, Basil and Goat Cheese Quiche
5. Cheese
-6 oz feta cheese (my personal favorite)
-6 oz goat cheese (gives the quiche a great creamy texture)
-6 oz shredded cheddar, swiss, whatever you want
6. Meat (optional)
-Bacon, this is really your only option if you choose to add meat. I usually use 1/4 of a package.
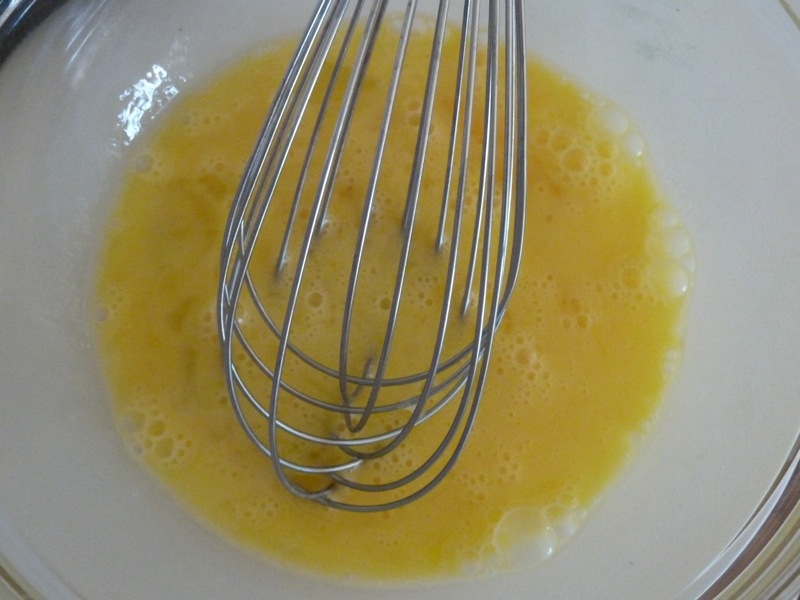
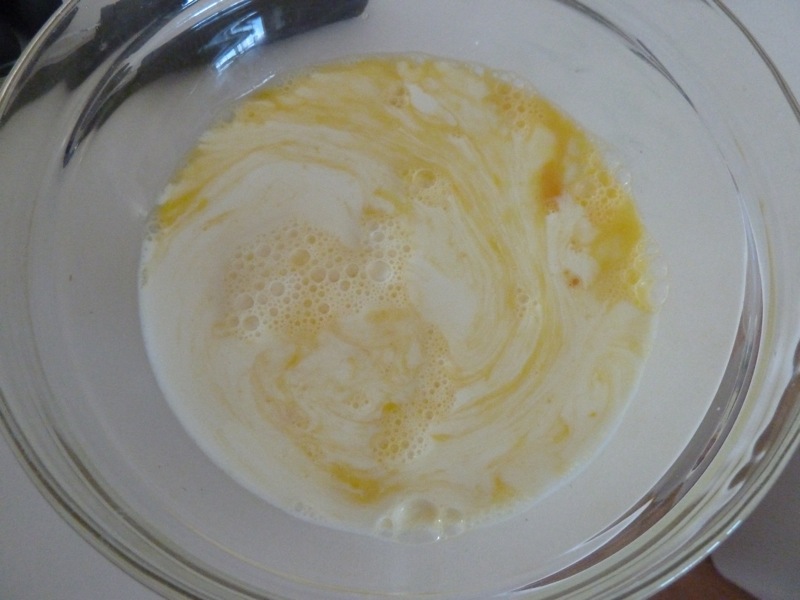
Ok, now we're ready to make our very own quiche! Make sure your pie crust is ready and that your oven is preheated to 375 degrees. 1. Prepare the vegetables (and bacon if you're including it). Taste the veggies to make sure they are to your liking. Season as necessary. If they don't taste good now, they won't when they are in the quiche, either! 2. Whisk your eggs. 3. Pour the milk into the eggs. 4. Add the vegetables and cheese. 5. Pour the egg mixture into your pie crust (which has been placed in a pie pan). 6. Bake at 375 degrees for 50 minutes, or until the quiche doesn't jiggle when shaken. Check during baking to make sure the crust isn't browning too fast. If it is, cover it with aluminum foil. (And be sure to clean up any messes before you take photos for your blog...) 7. Serve immediately, or cover with aluminum foil and refrigerate for a delicious breakfast for the rest of the week!
I'd love to hear about any quiches that you make!
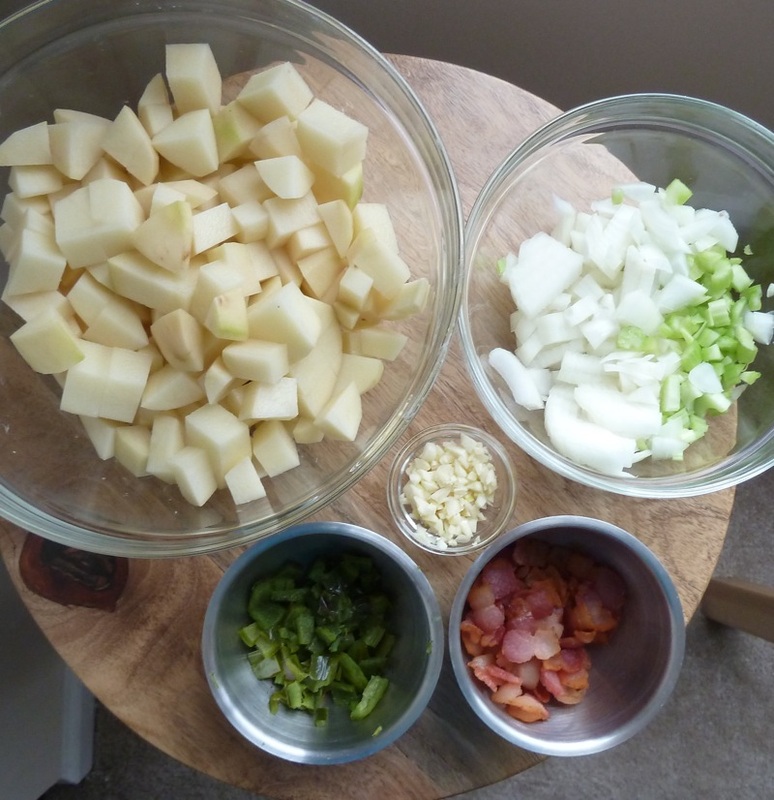
I love potato soup! Isn't it just perfect for a snowed in day? Especially when the soup has a bit extra heat like this one. The roasted jalapenos give this soup quite a kick! This soup requires a lot of prep, but isn't it nice sometimes to just take your time? It can be so peaceful to chop tons of veggies and think about what a blessing it is to even have food to chop, you know?
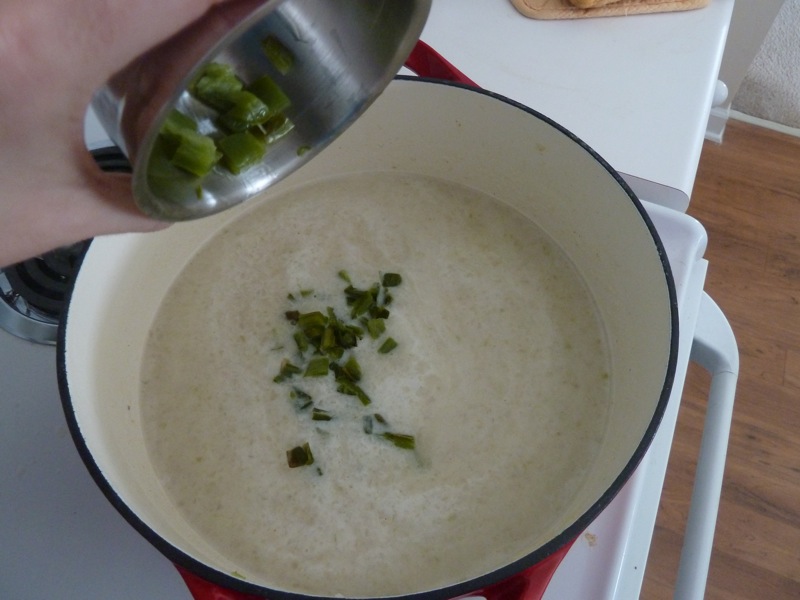
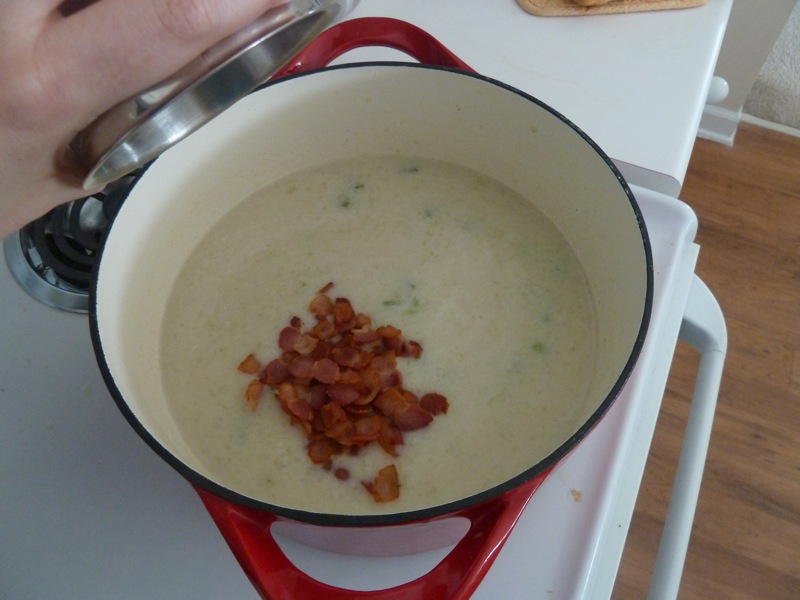
First you'll need to roast 1 or 2 jalapenos under the broiler. I used 2 because we like spicy food, but it was really very spicy so 1 might be sufficient. Broil them for 10 minutes, flipping once. While the peppers are roasting, cook 6 slices of chopped bacon and then drain them on a paper towel. Pour 1 tablespoon of the bacon grease into the pot you will use for the soup.
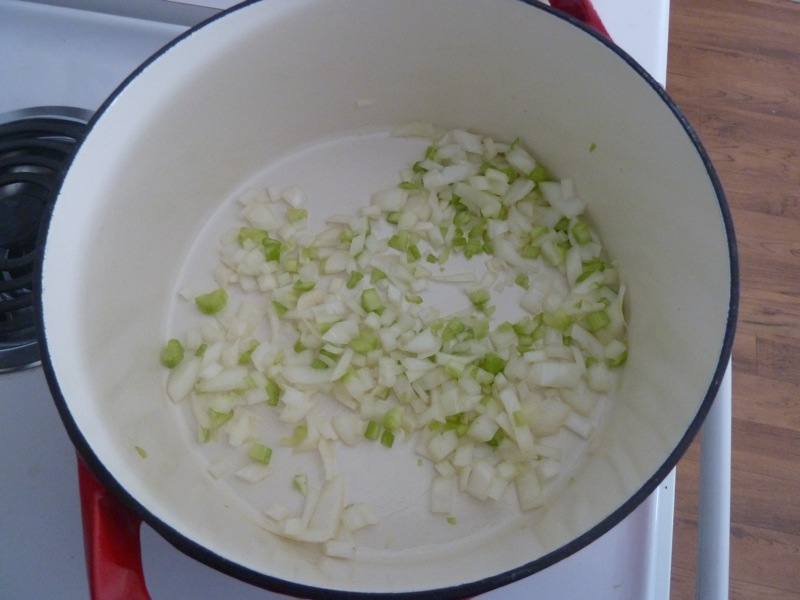
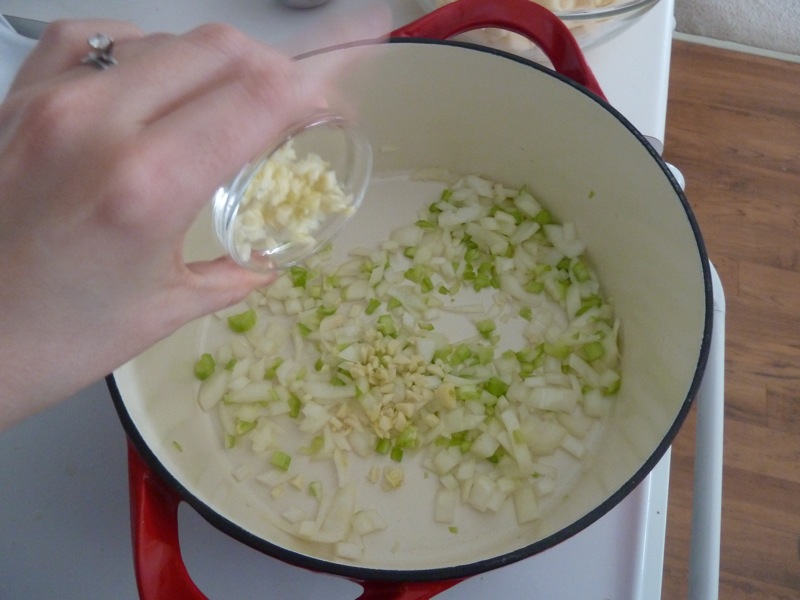
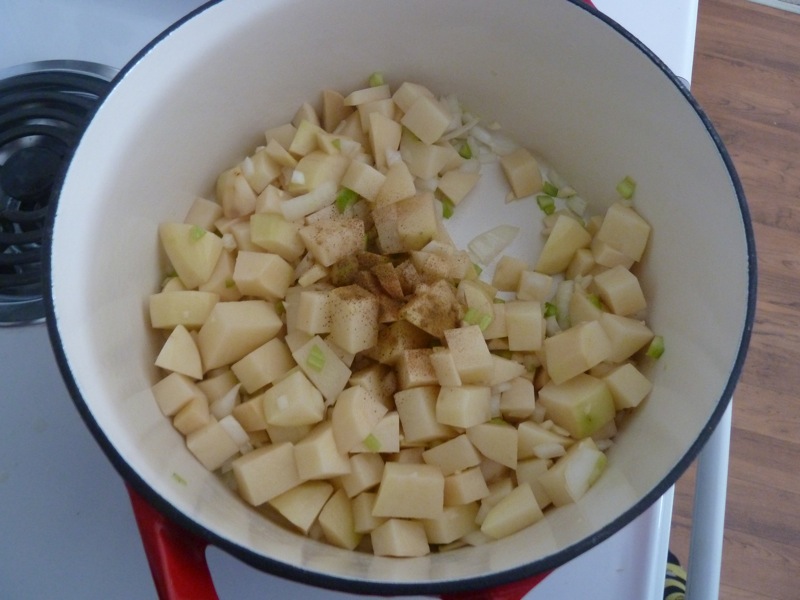
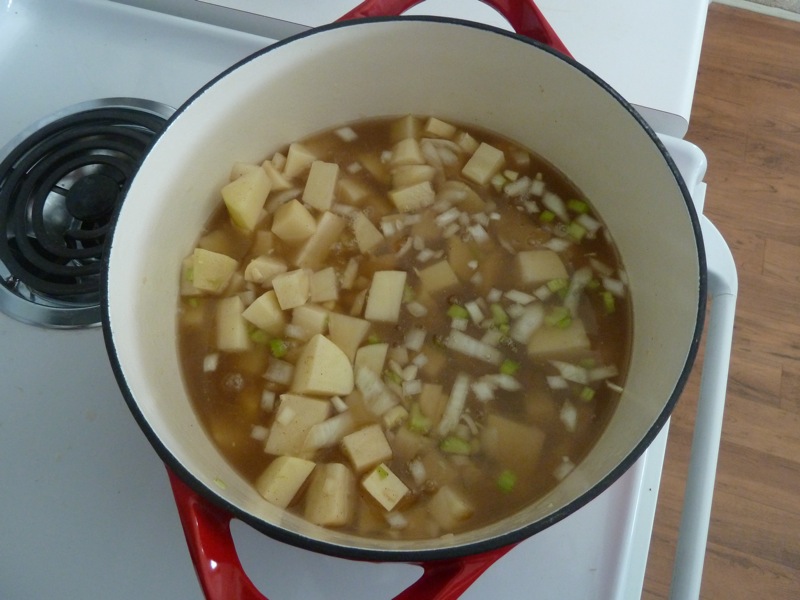
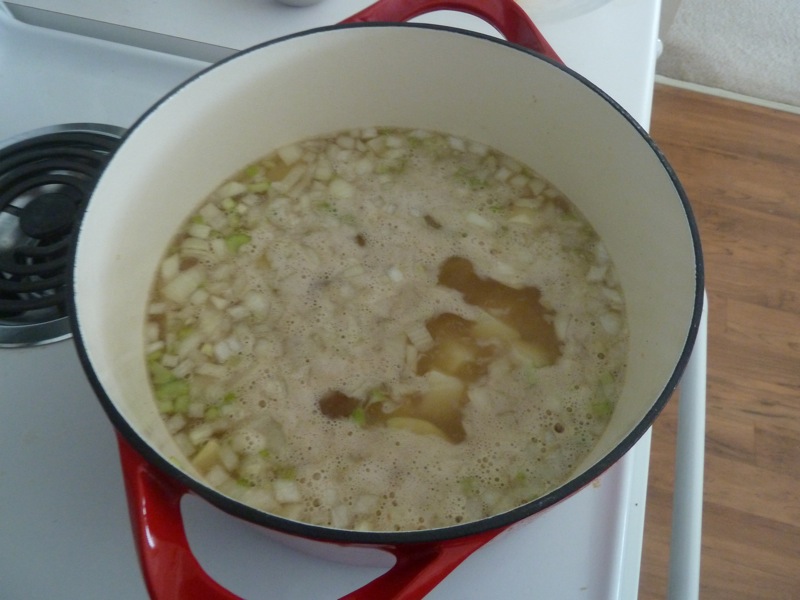
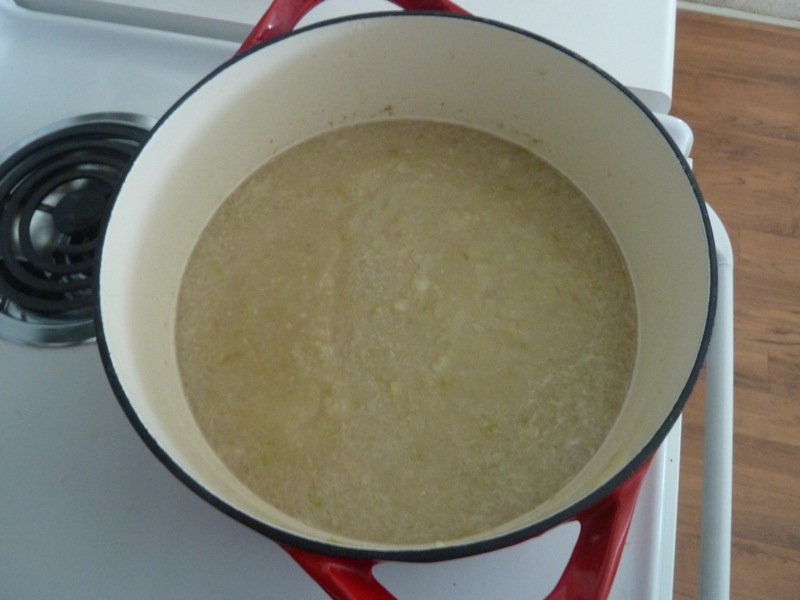
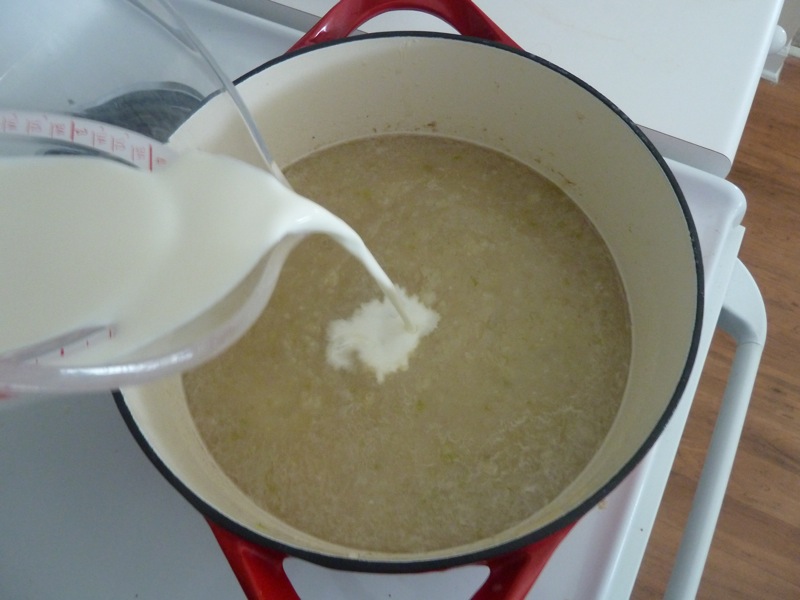
Let the jalapenos and bacon cool as you peel and chop 2 lbs potatoes, 1 celery stalk, 1/2 yellow onion, 4 cloves garlic, and cilantro. Now the jalapenos are cool enough to slice. Be sure to discard the seeds, and be careful not to get spiciness in your eyes! I always wear gloves when I handle peppers, I've had way too many bad experiences! Anyway, now you can warm up the pot with the bacon grease and add the onion and celery. Cook on low until soft. Add the garlic and cook for 30 seconds more, garlic burns quickly. Add the potatoes, and some cumin and cayenne pepper, just a few shakes. Pour in 4 cups of chicken stock (homemade if you're feeling little-house-on-the-prairie-ish!) and bring to a boil. Then simmer uncovered for 30 minutes until the potatoes are tender. Remove from heat and let the soup cool for 10 minutes. Then blend the soup, in batches, until smooth. Pour in 1/2 cup buttermilk and 1/2 cup half and half. Mix in the creamy goodness. Pour in the roasted jalapenos... and the bacon. Warm up the soup a bit more and add salt if necessary. Then serve with cheddar cheese and cilantro! Potato Soup with Roasted Jalapenos and BaconAdapted from Homesick Texan1 or 2 jalapeno peppers 6 slices bacon, chopped 1 celery stalk, chopped 1/2 medium yellow onion, chopped 4 cloves garlic, chopped 4 cups chicken stock 2 pounds Russet potatoes, peeled and diced into 1 inch cubes pinch of cumin pinch of cayenne chopped cilantro 1/2 cup buttermilk 1/2 cup half and half salt and black pepper to taste shredded cheddar for serving Cook the jalapenos under a broiler for 10 minutes, turning once. Once cooled, remove the stem and seeds and chop. Cook the bacon on medium heat until crispy. Place the cooked bacon on a paper towel lined plate. Pour 1 tablespoon of the bacon grease into a large pot. Preheat the pot over low heat. Then add the celery and onion and stir occasionally until they're soft. Then toss in the garlic and cook for only 30 seconds. Add the potatoes, cumin and cayenne and then pour in the chicken stock. Turn the heat up to high and bring to a boil. Next turn the heat to low and simmer for 30 minutes or until the potatoes are tender. Remove from heat and let the soup cool for 10 minutes. Blend the soup until smooth by pouring the soup into a blender in batches. Return to the blended soup to the pot and pour in buttermilk and half and half. Warm over low heat until it's as warm as you want it. Add salt and pepper to taste. Serve with shredded cheese and cilantro. Enjoy!
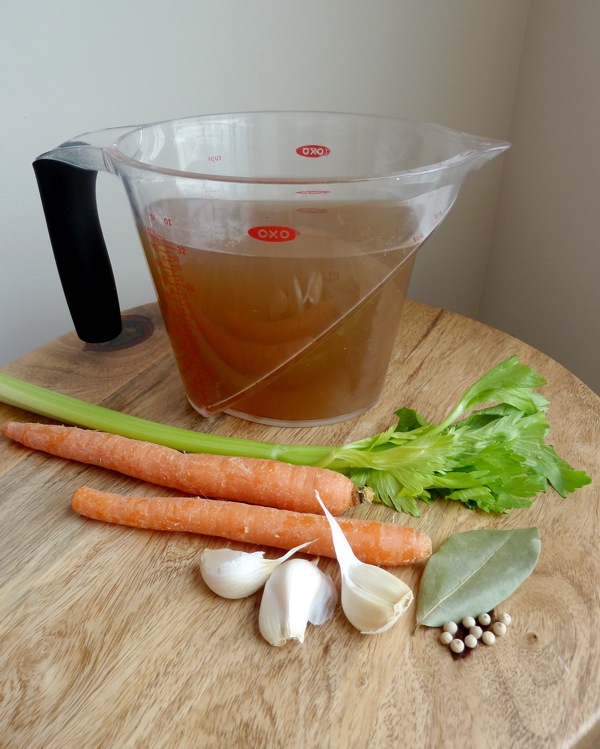
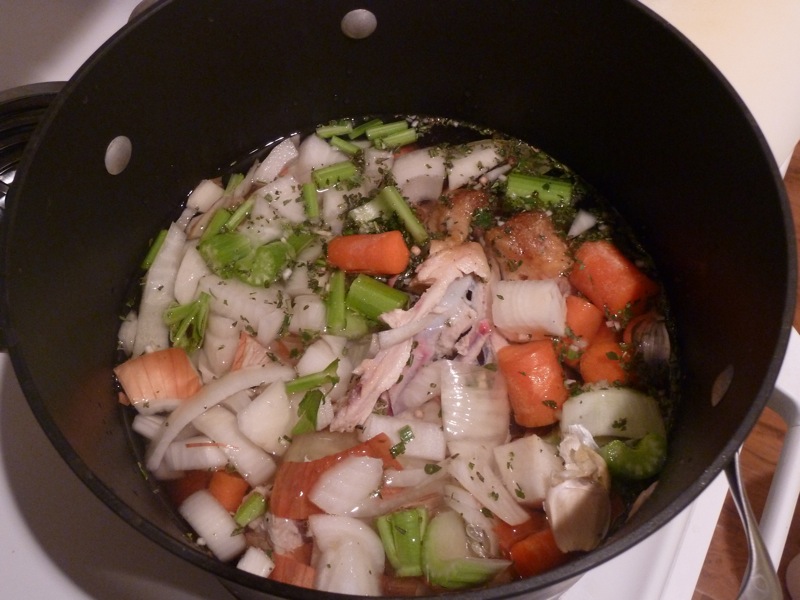
I made my first batch of chicken stock! I don't know if it's really cheaper than just buying it in a box, but it was fun to make and quite tasty! Plus, you get an added bonus: the satisfaction of using the entire chicken instead of throwing out the bones! It's easy, too! Just throw in the chicken, the veggies, the seasonings and the water and cook for a really long time, basically. Here's some more detailed instructions! Chicken StockAdapted from Bride and Groom First and Forever CookbookYields 6+ cups 3 pounds chicken bones (I used the bones from a 4 pound chicken) 10 cups water 1 large yellow onion, unpeeled, chopped coarsely 2 celery stalks, including leaves, chopped coarsely 2 medium carrots, chopped coarsely 2 cloves garlic, unpeeled, smashed 4 teaspoons poultry seasoning (dried thyme, parsley et cetera) 1 bay leaf 1 teaspoon peppercorns (I used white, but you could use black peppercorns, too) kosher salt to taste Combine all the ingredients in an 8 quart stockpot. You can add more water if needed to cover the ingredients. Bring to a boil over high heat and then reduce heat and simmer for 30 minutes. Skim the foam as it begins to form. Let it simmer for another 3 hours. Strain the stock through a colander into a large bowl. Then pour the stock into another large bowl through a fine mesh sieve. Let cool for a few minutes then refrigerate. Skim off the fat that will form on the top of the stock as it cools. The stock will keep for a week in the fridge, or you can freeze it and it will last for 3 months! Next time, I'll share a recipe in which you can use your homemade chicken stock!
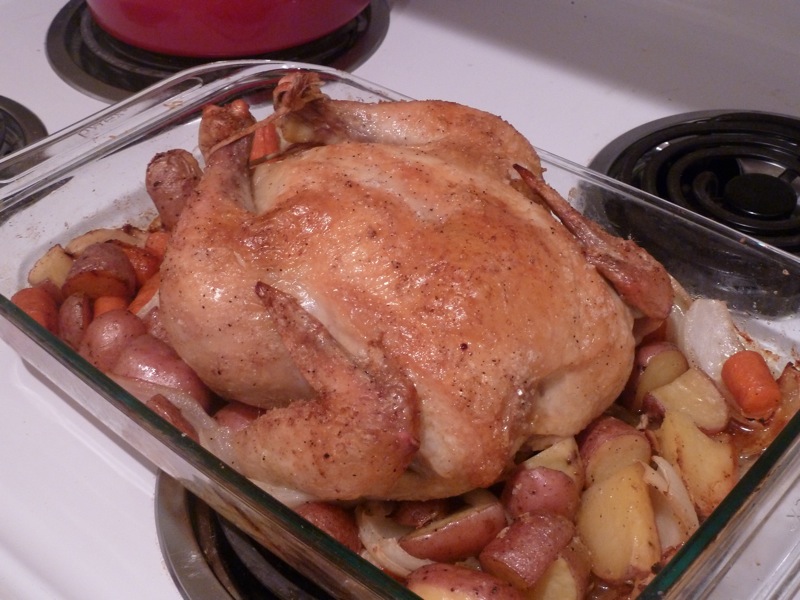
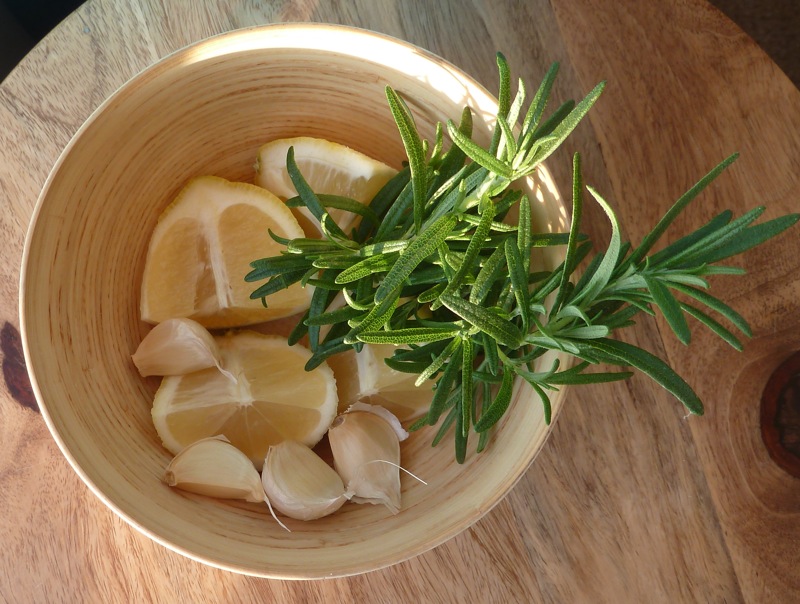
Nothing is better than roast chicken for dinner on cold days, right? Of course right. Especially when it's nestled in simple carrots, onions and potatoes. Plus, the chicken is seasoned with my favorite flavor combination right now, rosemary, garlic and lemon. Nothing else like it! I've made this recipe many times, and it's always super delicious, moist, and filling. Give it a shot! Roasted Chicken with Carrots and PotatoesAdapted from: Bride and Groom First and Forever CookbookServes 4 3 carrots cut into large pieces, like 6 pieces per carrot 8 red new potatoes cut into halves or quarters 1 medium yellow onion cut into 6 wedges 3 tablespoons olive oil kosher salt and freshly ground pepper 1 4 lb chicken 1 lemon, cut into quarters 2 fresh rosemary sprigs 4 cloves garlic, peeled and smashed Preheat the oven to 425 degrees. Place carrots, potatoes and onion in a 9X13 inch glass baking dish. Drizzle with 1 tablespoon of the olive oil and stir so the vegetables get coated. Sprinkle generously with salt and pepper. Spread the veggies to the edges of the baking dish to make room for the chicken. Place the garlic cloves in the space you just created by moving the veggies. Take the gross stuff (neck and giblets) out of the cavity of the chicken. Not all chickens are sold with the neck and giblets in a little bag placed in the cavity, so don't worry if you can't find them! Rinse the chicken and pat dry. Season the cavity with salt and pepper and put the rosemary and lemon inside. Place the chicken on top of the garlic cloves in the baking dish, this will keep the garlic from burning. Drizzle the chicken with olive oil and then season liberally with salt and pepper, don't forget the legs and wings! If you want, you can truss the chicken, but you don't have to. Roast for 45 minutes. After 45 minutes, use tongs to tilt the chicken so the juices come out of the cavity. Stir the vegetables into the juices and brush the juices onto the chicken. If the skin is browning quite a bit, place aluminum foil loosely over the bird. Continue roasting until the chicken has cooked to an internal temperature of 170-175, or until the juices run clear when you poke the thigh joint with your knife. This should be another 25 to 30 minutes, but it could be more. When it's done, move the chicken to a platter and let it rest for 10 minutes. Stir the vegetables in the garlic and juice and squeeze some lemon juice over them. Yumm! I wish I could give you tips for carving the chicken, but I can't. I'm definitely not an expert. Cutting the legs off is especially difficult, I basically just mangle them until they fall off. They may not be pretty, but they sure will be delicious! If you've never roasted a chicken before, you've really got to try it. It's easier than it sounds and it's so homey and delicious! Remember to save the bones so you can make a stock. I'll show you how next time!
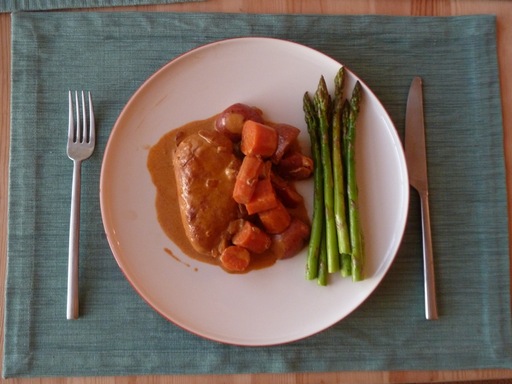
Fancy, right? This meal features chicken breast smothered with a creamy dijon paprika sauce accompanied by carrots and new potatoes cooked to perfection in the same pot as the chicken. A side of crisp, simple asparagus is a great complement to the richness of the main course. Let's make it! Actually before we make it we need to marinate the chicken over night, or for a few hours. Soak 4 chicken breasts in 1/3 cup olive oil, 1/3 cup fresh lemon juice (about 1 1/2 - 2 lemons) and 1 tablespoon of Lawry's seasoned salt, if you have it. I used this copycat salt mixture instead. I should name this pot, I use it all the time (you may have noticed) and love it. Maybe Giada? It's Giada De Laurentiis brand from Target. Nah, I think I can come up with something more creative.
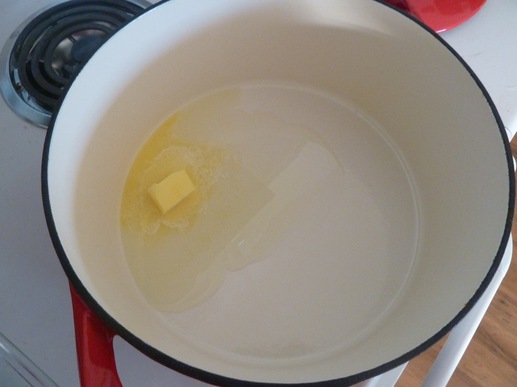
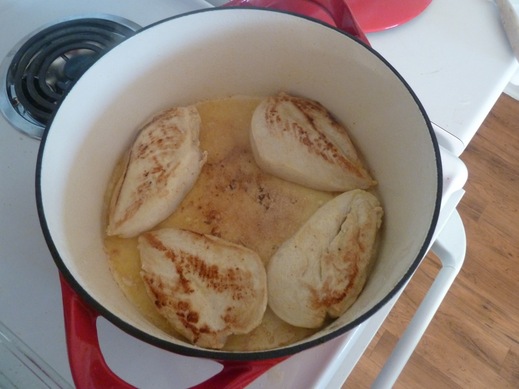
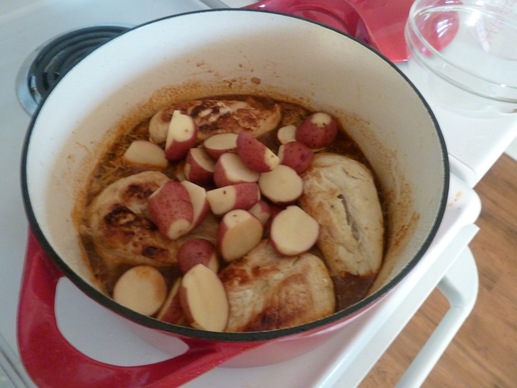
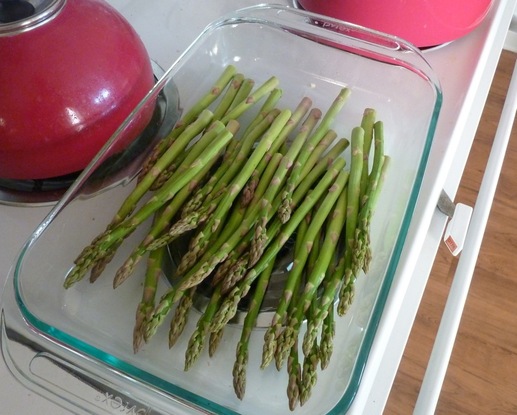
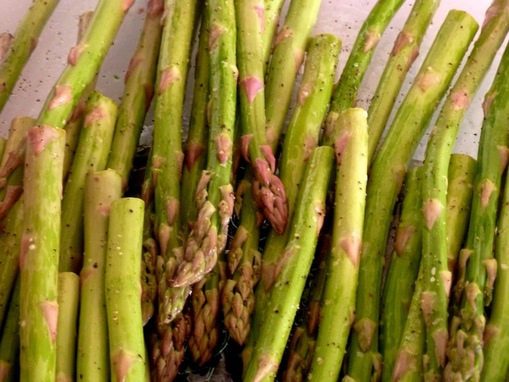
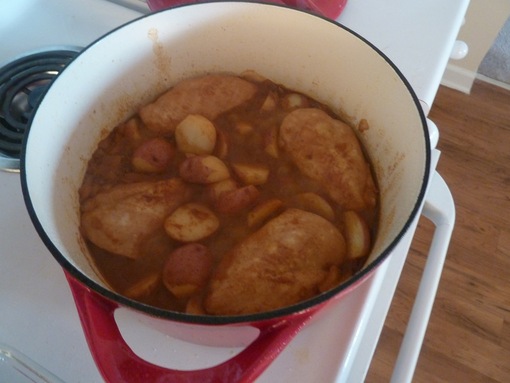
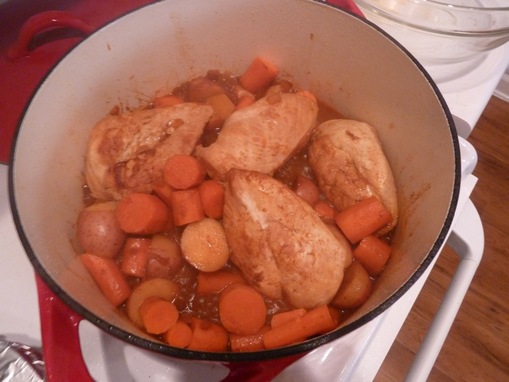
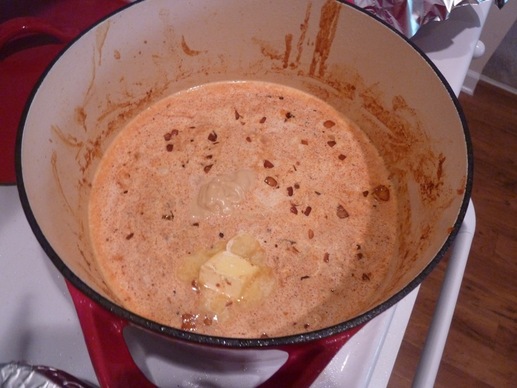
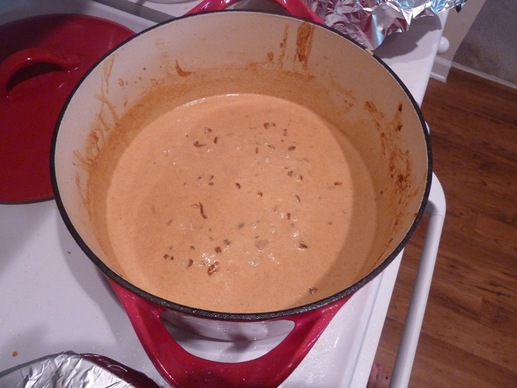
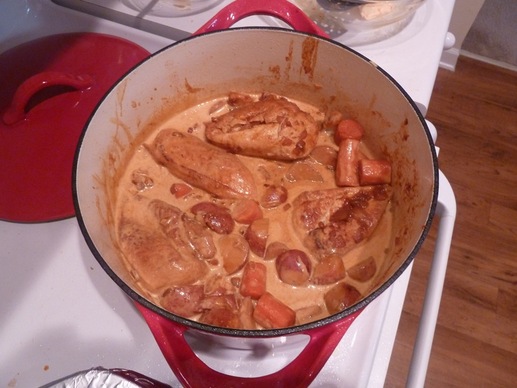
Anyway, once you're done marinated the chicken, heat up 2 tablespoons butter and 2 tablespoons olive oil in a dutch oven or big pot with a lid. Cook the chicken breasts for 3-4 minutes on each side over medium heat. We're just searing the outside, they'll have plenty of time to cook later. Remove the chicken to a big bowl and cover with foil. Add a chopped yellow onion to the pot, and let it soak up all the chicken juices and deliciousness for about 2 minutes. Until they are softened and amazing looking! Now add 2 tablespoons paprika and 1 cup chicken stock and stir together. Return the chicken to the pot (and their juices) and add the new potatoes. Cover and cook 10 minutes over medium to medium high heat. While you wait, preheat your oven to 400 degrees. Prepare some asparagus (wash and dry them and cut off the brittle ends) and spread them in a baking dish. Toss them with some olive oil, 1 or 2 tablespoons and sprinkle with salt and pepper. Looks good already, right? After 10 minutes have passed the potatoes will look like this and, your oven is ready so put the asparagus and set a timer for 20 minutes. Now, add carrots to the pot, put the cover back on and set a different timer for 15 minutes. Take a 15 minute break, pour yourself some wine, read a book, and afterward, your carrots and potatoes will be perfectly cooked! With a slotted spoon, take the veggies and chicken out of the pot and put them into the big bowl you used earlier and cover with foil. This is what you will have left, where did all that chicken stock go? It's a mystery! Add 2 more tablespoons of butter, 2 tablespoons of dijon mustard, and 1 cup of heavy cream. It looks kind of weird at first... But after a few minutes of stirring and warming it will be a beautiful, tangy, creamy sauce. Give it a taste and add some salt or mustard if you think it needs some. Once the sauce is perfect, return the chicken and veggies to the pot. Gently stir so the sauce coats everything. Your asparagus should be finished already, so dinner is served! Enjoy! Paprika Dijon Chicken with Asparagussource: adapted from my Dad's recipe Marinade: 1/3 cup fresh lemon juice (1 1/2-2 lemons) 1/3 cup olive oil 1 tablespoon Seasoned Salt (I used this mix) Asparagus Side: 1 bunch asparagus, cleaned and tough ends removed 1-2 tablespoons olive oil salt and pepper to taste a bit of lemon juice (optional) Main Course: 4 chicken breasts 2 tablespoons olive oil 4 tablespoons butter, divided 1 yellow onion, chopped 2 tablespoons paprika 1 cup chicken stock 12 small new potatoes, cut in half 1 bunch carrot, cut into large pieces as seen in the pictures 2 tablespoons dijon mustard 1 cup heavy cream salt and pepper to taste Marinate chicken overnight, or for 3 hours or so if that is all the time you have. In a dutch oven, or large pot with a lid, heat 2 tablespoons butter and 2 tablespoons olive oil over medium heat. Saute chicken breasts for 3-4 minutes on each side. Remove to a bowl, cover with foil. Add onion and saute until soft, 2-3 minutes. Stir in paprika, pour in the chicken stock. Return the chicken to the pot and add the new potatoes. Cover and cook for 10 minutes. Preheat the oven to 400 degrees and wash, dry and trim the asparagus. Toss with olive oil and season liberally with salt and pepper. Roast for 20 minutes. Add carrots to the pot, cover and cook for 15 more minutes. With a slotted spoon remove chicken, potatoes and carrots to a separate bowl and cover with foil. Reduce heat to low and add mustard, cream and 2 tablespoons butter to the pot. Stir and adjust heat until the sauce has reached your desired consistency. Add salt and pepper to taste. Return chicken, potatoes and carrots to the pot. Mix gently to coat with the sauce and serve with roasted asparagus.
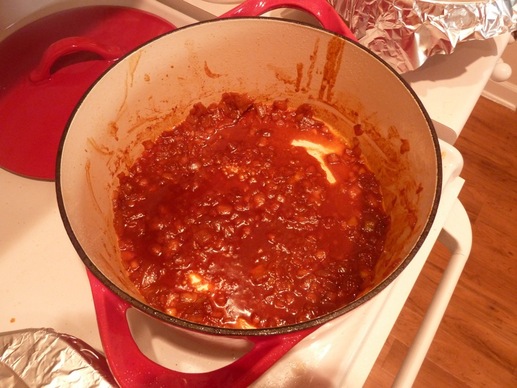
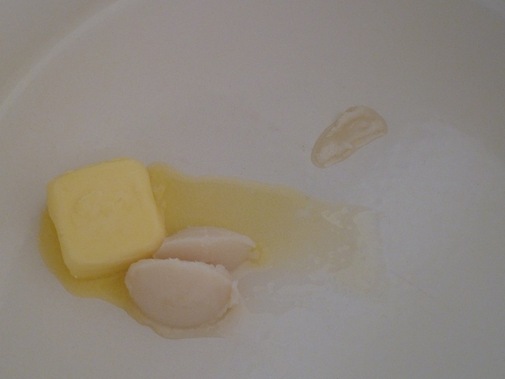
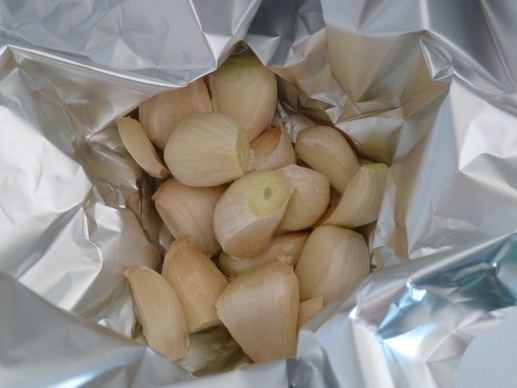
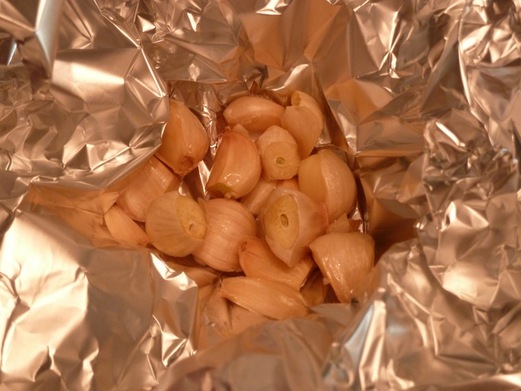
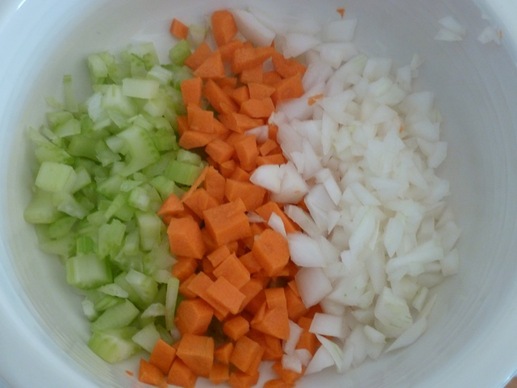
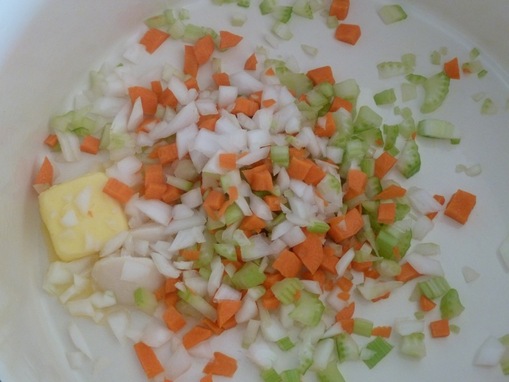
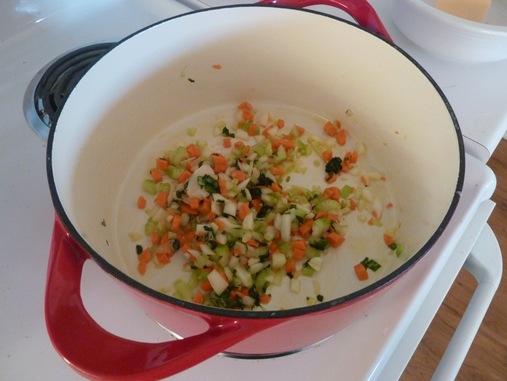
My friend Alyssa recommended this recipe to me. I'm so glad she did, it is freaking delicious! You know it's going to be good when it starts with butter and bacon grease, right? Of course right. But I'm getting ahead of myself, first we need to roast some garlic. Don't worry, it's not difficult. Just separate the cloves from a head of garlic, rub off the papery parts and then chop off the pointy ends of the garlic. You don't even have to peel them! This way, once they're roasted, you can just squeeze the cloves and the garlicy goodness will pop out. If that doesn't sound delicious I don't know what does. Just put the cloves in some foil, drizzle with olive oil and gather the foil together so it looks like a hershey kiss. Then let it sit in the oven for an hour at 250 degrees and the garlic will be soft, slightly caramel colored and incredible. Resist the urge to eat them just like this. While the garlic is roasting, chop up a celery stalk, a carrot and 1/4 of an onion. This is when the butter and bacon grease come in. Throw in your veggies with the butter and bacon grease to "sweat" for 15 minutes. I interpreted "sweat" as just cook on very low heat.
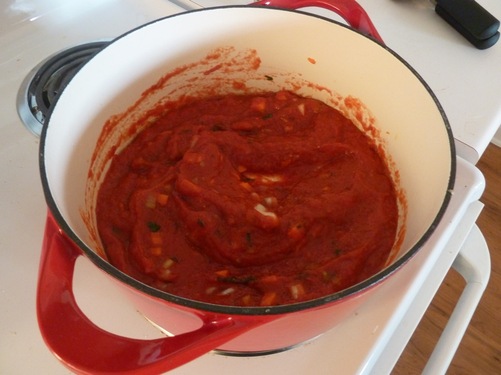
While you wait, get a bit of sugar, chop up some basil and open a can of crushed tomatoes. Then take a seat and enjoy the amazing smells coming from your kitchen. After 15 minutes, add the sugar, chopped basil and 1 more tablespoon of bacon grease. Then pour in the crushed tomatoes. Stir it together and bring it to a boil. Then reduce the heat and let it simmer, covered for 30 minutes. Once the garlic is done, pop as many cloves as you want into the tomato mixture, I added 10 medium sized cloves, but after tasting it, I wish I added more!
After half an hour, stir in a big pinch, more like half a handful, of parmesan cheese (freshly grated please!). Cover and continue to let the tomato mixture simmer for another 30 minutes.
Then, turn off the heat and let it cool for 15 minutes. We're going to blend it next, and you don't want to put very hot things in your glass blender do you? Once cooled, blend it until it is smooth. All the garlic, celery, carrot, onion and basil goodness will permeate through the soup as it blends. Yummm.
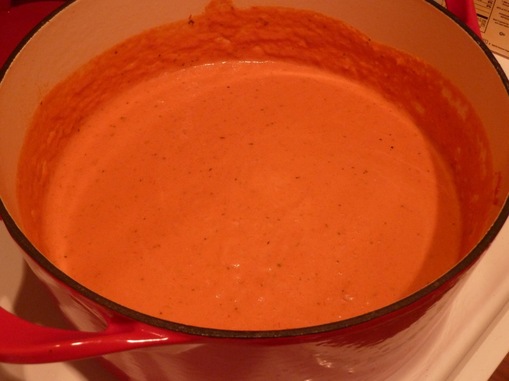
Pour the mixture back into the pot and add 1 cup milk and 1 cup cream, or 2 cups cream. Stir it all together until it looks like this. Now give it a taste. Does it need salt? Add some! Does it need to be warmed up a bit? Do it! All this work, you want the soup to be perfect, right?
Next, and this is absolutely crucial, make a grilled cheese sandwich! Creamy Tomato Soupadapted from Homesick Texan1 28 0z can crushed tomatoes 1 head of garlic, roasted 2 tablespoons chopped basil 1/4 onion, diced 1 celery rib, diced 1 carrot, diced 2 tablespoons bacon grease (I just happened to have some on hand, if you don't, don't let that stop you from trying this. The soup will still be fabulous without it!) 1 tablespoon butter 1 teaspoon sugar salt to taste 1 cup milk 1 cup cream (or 2 cups cream and no milk) 3 tablespoons freshly grated parmesan cheese Divide head of garlic into separate cloves. Rub off the papery shell, but don't peel them. Cut off the pointy parts of the cloves. Put on foil, drizzle with olive oil and gather foil so it looks like a hershey kiss. Roast for 1 hour at 250 degrees. Heat onions, celery and carrot with butter and 1 tablespoon bacon grease on low heat for 15 minutes. Stir in sugar, basil, 1 tablespoon bacon grease and tomatoes. Bring to a boil then simmer, covered, for 30 minutes. When garlic is finished roasting. Squeeze the cloves out of their shell into the soup. Add as many as you like. Stir in cheese, then continue to let the tomato mixture simmer, covered for 30 more minutes. Remove from heat and let cool for 15 minutes. Puree tomato mixture until smooth, stir in milk and cream. Add salt to taste and warm until desired temperature for serving. Enjoy with a gooey grilled cheese sandwich.
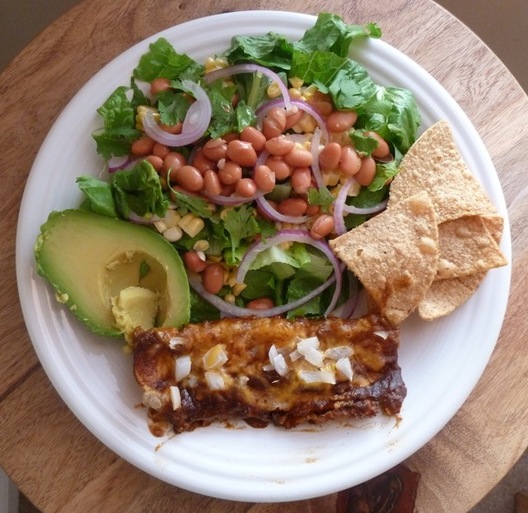
Remember summer? Me neither. Don't we need a little reminder? Yes, I think so. The Simple Southwestern Salad is so easy, refreshing and tasty. It is the perfect compliment to the cheese enchiladas I shared a few weeks ago. Plus, you probably have most of the ingredients in your pantry already! Simple Southwestern Salad with Corn and AvocadoSource: Real SimpleServes 4 2 heads romaine lettuce, cut into pieces 2 ears of corn, with kernels cut off (please don't use frozen corn, it would make the salad bland and lack texture. But it is your salad, maybe you prefer salads like that!) 2 avocados (cut into cubes, I just halved mine because I was in a hurry, and I'm lazy.) 1 15.5 ounce pinto beans, rinsed 1/2 red onion thinly sliced a handful fresh cilantro 1/4 cup olive oil 1/4 cup fresh lime juice 1/2 teaspoon ground cumin 3/4 teaspoon salt 1/4 teaspoon pepper tortilla chips Combine the lettuce, corn, avocados, beans, onion and cilantro in a large bowl. Mix together oil, lime juice, cumin, salt and pepper in a small bowl or shake it together in a mason jar. Toss the salad with the dressing and serve with some tortilla chips on the side. I like to crumble them up and mix them into the salad. Yummmm.
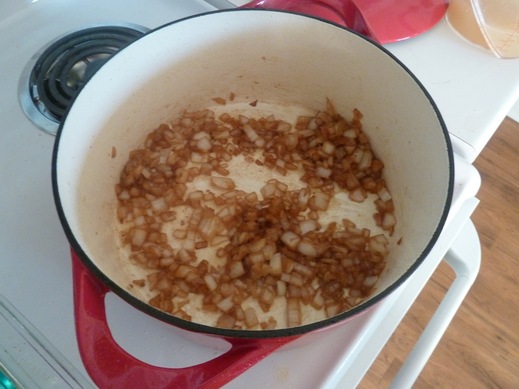
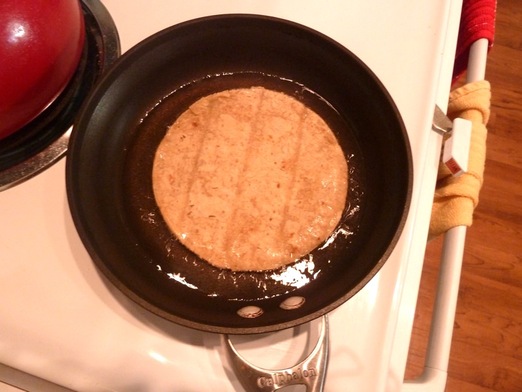
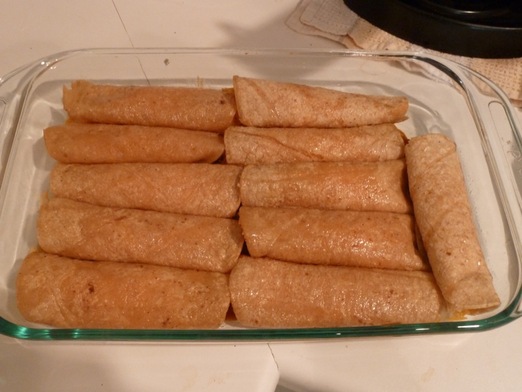
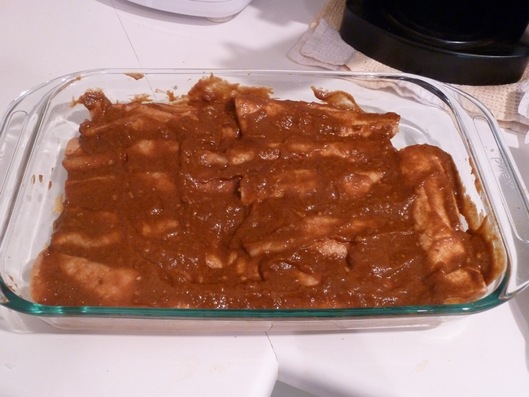
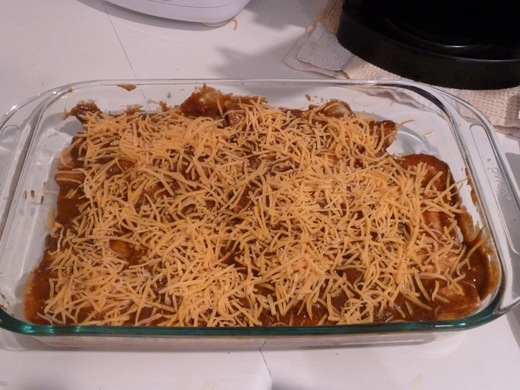
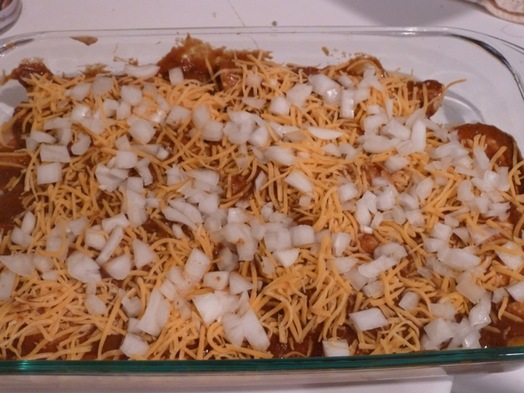
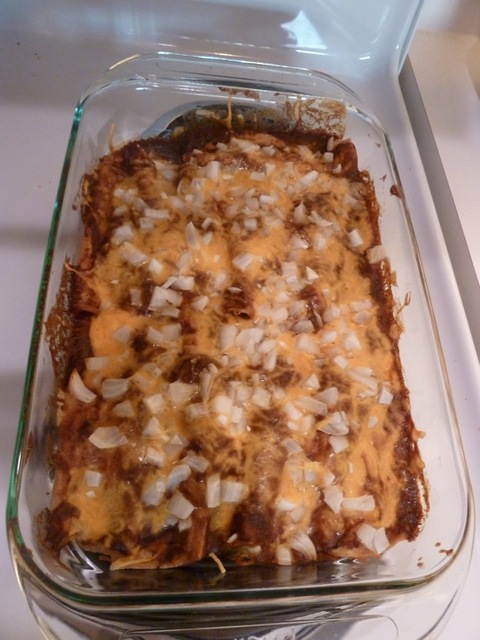
Yummmmm. We ate this meal to celebrate the last day of summer. That's right, like a month ago. I've been a very bad blogger. Forgive me. But it dawned on me today that part of why I have been feeling so overwhelmed is because I haven't been giving myself time to do what I want to do. So, in an effort to give myself a break, I am writing this post. I hope it inspires you to take a break from your crazy lives and make this delicious dish! Let's get right to it! Quick! Go buy some corn tortillas, shredded cheese and an onion! Oh, and make that chili gravy I told you about. Now, preheat your oven to 450 and lightly grease a 9X13 baking dish. Spread 1/2 cup of the chili gravy in the baking dish. This is where the magic happens people. Yes, frying each tortilla seems a little extravagant, but I'm not joking, it totally makes the dish! It enhances the delicate taste of the corn tortillas (something I've always wondered how to do, my tortillas would always taste bland and dry) as well as makes them pliable for forming enchiladas. I almost skipped this step, erroneously supposing that I was wiser than Lisa Fain (the Homesick Texan). I'm so glad I didn't! Ok, now that I've convinced you to fry your tortillas, here's how you do it. Heat 1/2 cup of vegetable oil in a small pan. Heat the tortillas in the oil one at a time, for a couple of seconds per side. Stack them in paper towels and cover them while you heat up the others to keep them warm. Fill each tortilla with 1/4 cup of cheese and 1 tablespoon of chopped onion. Roll it... and place them seam down in the baking dish on top of the chili gravy. Pour the rest of the chili gravy over the tortillas. Sprinkle all the cheese you have left on top. And the rest of the onion, too. Bake for 10 minutes or until the cheese is melted and the sauce bubbles. Yummmmm. Even though I made these a month ago, I can still remember exactly how they taste sooo goooooood. I've made many an enchilada, much fancier versions too with homemade tomatillo sauce, but these are truly my favorite. So easy and they remind me of home! Cheese Enchiladasadapted from Homesick Texan1/2 cup vegetable oil 10-12 corn tortillas 4 cups shredded cheddar cheese 1 medium onion, chopped 2 cups chili gravyPreheat the oven to 450 and grease a 9X13 baking dish. Spread 1/2 cup of the chili gravy in the bottom of the baking dish. Pour the oil in a small pan and warm up the tortillas individually. Wrap them in paper towels to keep them warm while you heat the rest. Spoon 1/4 cup of cheese and 1 tablespoon of onion in a tortilla and roll it. Place it seam down in the baking dish. Repeat with each tortilla. Pour the rest of the chili gravy over the tortillas and spread it to make sure it covers evenly. Sprinkle the rest of the cheese and onion on top too. Bake for 10 minutes or until cheese is melted and sauce bubbles. P.S. I'll share the recipe for a fresh, crisp accompanying salad soon!
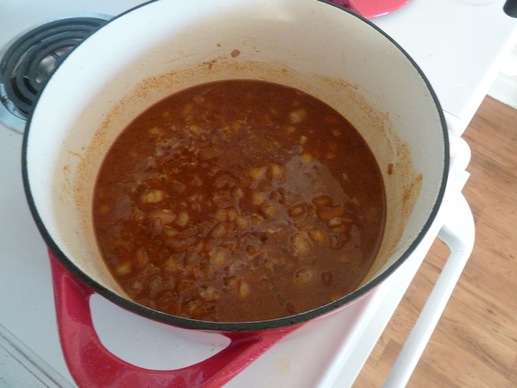
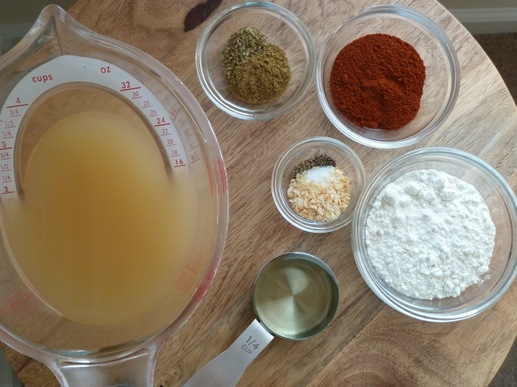
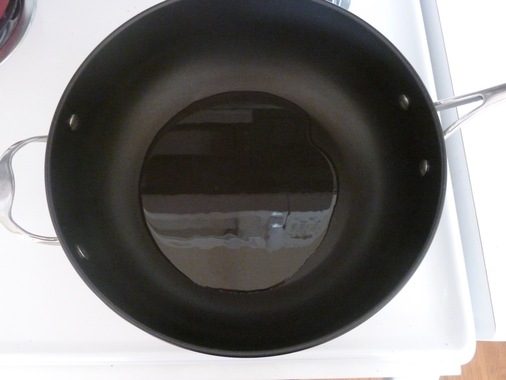
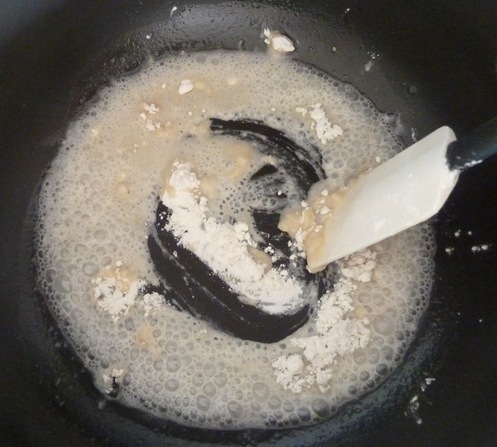
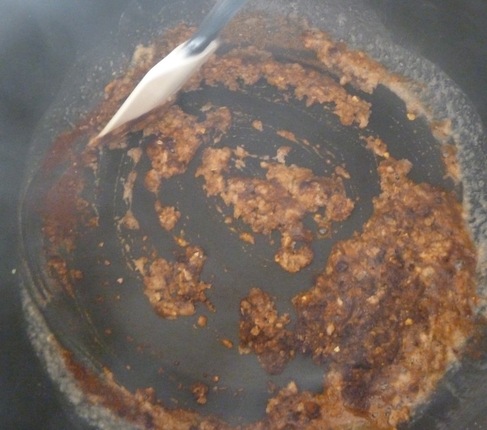
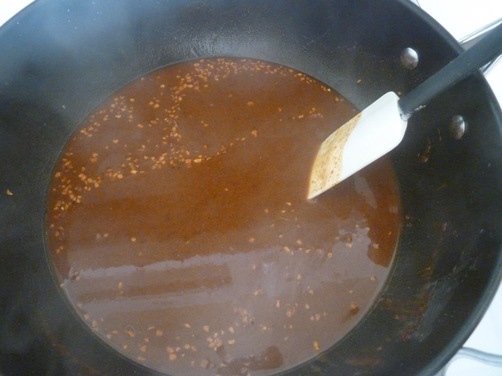
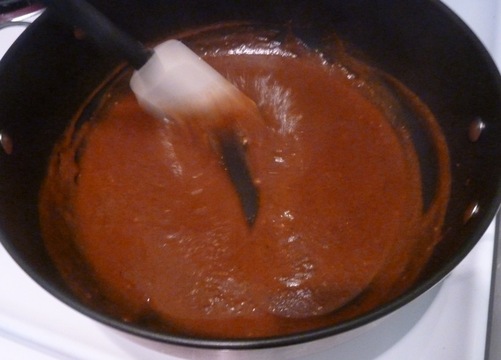
I'm not whistling dixie, you guys. This gravy is the key ingredient to all truly Tex-Mex cuisine. Fellow Texans, you know how Mexican food from any other state just doesn't hit the spot? You know why? It's because they don't use this sauce. No joke. But now, you can make this gravy in your own home to top enchiladas (recipe soon to come), burritos, chile relleno, or whatever suits your fancy. The best part? You probably have all the ingredients in your pantry right now! Here's what you need: chicken broth, cumin, oregano, chile powder, flour, vegetable oil, powdered garlic (I only had garlic flakes, so I used those), salt and pepper. 1. Heat up the oil in a pan over medium high heat. 2. Stir in the flour and keep stirring until it mixes in completely and becomes light brown, this is called a roux. 3. Add the spices and keep stirring. Cook only for a minute more. You don't want to burn them! I did, hence the smoke, but it was still tasty. 4. Pour in the chicken broth and stir so the spices mix in nicely and the sauce thickens. If you use garlic powder, your sauce won't have these garlic flakes floating around, which is probably best. 5. Turn heat to low and simmer, stirring occasionally, until the sauce is thick enough to push a spoon (or spatula in my case) through it and you can see the bottom of the pan, about 15 minutes. If you're like me, you probably doubt that such a simple sauce can be so freaking delicious. Well, you're wrong, just like I was. It's creamy, earthy, just spicy enough and crave-worthy. Definitely give this a shot, it will revolutionize your enchiladas! I used it to make plain cheddar cheese enchiladas, I'm still day dreaming about them, soooooo gooooood. I'll share that recipe next. Chili Gravy Source: Robb Walsh via Homesick Texan1/4 cup vegetable oil 1/4 cup flour 1/2 teaspoon pepper 1 teaspoon salt 1 teaspoon powdered garlic 2 teaspoons ground cumin 1/2 teaspoon dried oregano 2 tablespoons chili powder 2 cups chicken broth Heat up the oil in a pan over medium high heat. Stir in the flour and keep stirring until it mixes in completely and becomes light brown. Add the spices and keep stirring. Cook only for a minute more. Pour in the chicken broth and stir so the spices mix in nicely and the sauce thickens. Turn heat to low and simmer, stirring occasionally, until the sauce is thick enough to push a spoon through it and you can see the bottom of the pan, about 15 minutes. Yields about 2 cups.
|


 RSS Feed